

This article will explain how to remove and install seats on your Indian Motorcycle. Shop Indian Motorcycle seats
Indian Vintage, Chieftain, Indian Springfield, Model Year 2020 and Older Chief Models
To remove the seat:
1. Remove the left side cover to access the tool kit.
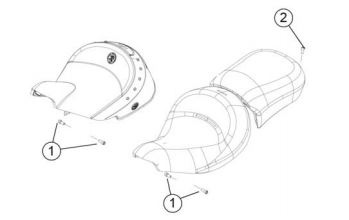
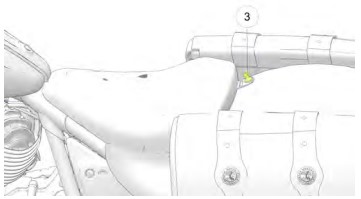
2. Locate the seat mount brackets under the edge of the driver's seat. Using a 6mm Allen socket, remove the seat mount bolt (1) from each side of the seat.
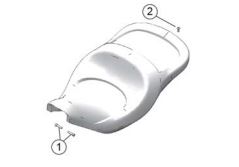
3. Using a 6mm Allen socket, remove the rear bracket bolt (2), washer and nylon grommet from the passenger portion of the seat (if equipped). Motorcycles that have a one-piece seat (pictured below) also have a rear bracket bolt that must be removed.
4. Lift the rear of the seat and pull it rearward to disengage the front mounting tab of the seat from the frame mount. Do not allow the seat mount brackets to contact the rear fender.
To reinstall the seat:
1. Position the seat by inserting the seat mounting tab from rear to front into the mount on top of the frame.
2. Rotate the rear of the seat downward and position the side mount seat brackets onto the frame. Do not allow the seat mount brackets to contact the rear fender.
3. On each side, thread the seat mount bolt through the seat mount bracket and into the frame. Torque seat bolts to 18 ft-lbs (24 Nm).
4. Secure the passenger seat (if equipped). Gently raise the rear bracket and reinstall the nylon grommet. Thread the rear bracket bolt and washer through the bracket and nylon grommet. Torque the bolt to 96 in-lbs (10.8 Nm).
Model Year 2022+ Chief
To remove the seat:
1. Place the motorcycle on a level surface, with the kickstand extended.
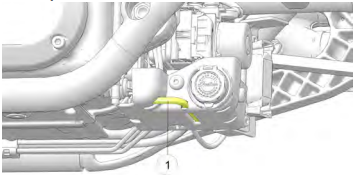
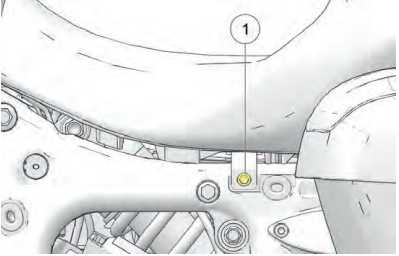
2. Locate the seat removal tool (1) attached to the motorcycle undertray.
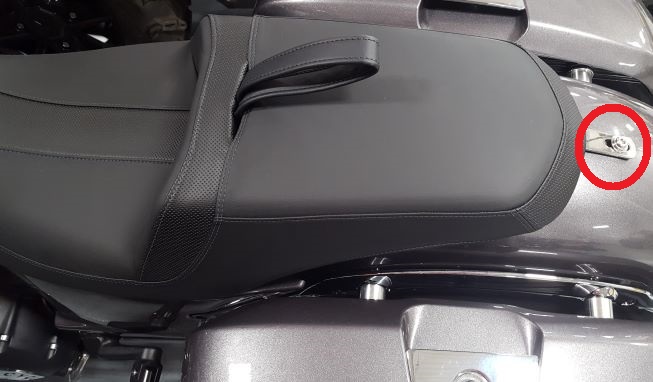
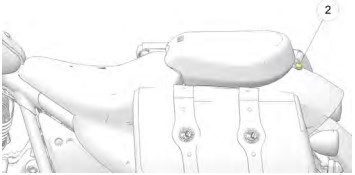
3. On models equipped with a passenger seat, remove the rear seat bracket bolt (2), washer, and nylon grommet.
4. Lift the rear of the seat and pull upwards to disengage the seat grommet from the passenger seat post. Continue to pull up on the seat until the grab strap is pulled completely through the seat.
5. Remove the passenger seat post from the front seat bracket (3). Lift the rear of the seat and pull rearward to disengage the front seat from the front frame mount.
To reinstall the seat:
1. Position the seat by inserting the seat mounting tabs from rear to front into the frame.
2. Rotate the rear of the seat downward and position the rear mount seat bracket onto the fender.
3. Thread the seat mount bolt through the seat mount bracket and into the fender. Torque the seat bolt to 13 ft-lbs (18 Nm).
4. Position the passenger seat near the fender and push the grab strap through the seat bottom (if equipped).
5. Lower the passenger seat onto the seat post and push downward to engage the seat grommet to the seat post.
6. Gently raise the rear bracket and reinstall the nylon grommet.
7. Thread the rear bracket bolt and washer through the bracket and nylon grommet. Torque the bolt to 13 ft-lbs (18 Nm).
Roadmaster
To remove the seat:
1. Remove the left side cover to access the tool kit.
2. Remove the trunk.
3. Disconnect the trunk harness from the main harness.
4. Locate the seat mount brackets under the edge of the driver's seat. Using a 6mm Allen socket, remove the seat mount bolt (1) from each side of the seat.
5. Using a 6mm Allen socket, remove the rear bracket bolt (2), washer and nylon grommet from the passenger portion of the seat.
6. Lift the rear of the seat and unplug the seat heater.
7. Pull the seat rearward to disengage the front mounting tab of the seat from the frame mount. Do not allow the seat mount brackets to contact the rear fender.
To reinstall the seat:
1. Position the seat by inserting the seat mounting frame tab from rear to front into the mount on the top of the frame.
2. Reconnect the seat heater.
3. Rotate the rear of the seat downward and position the side mount seat brackets onto the frame. Do not allow the seat mount brackets to contact the rear fender.
4. On each side, thread the seat mount bolt through the seat mount bracket and into the frame. Torque the seat bolts to 18 ft-lbs (24 Nm).
5. Gently raise the rear bracket and reinstall the nylon grommet. Thread the rear bracket bolt and washer through the bracket and nylon grommet. Torque the bolt to 96 in-lbs (10.8 Nm).
6. Reconnect the trunk harness to the main harness.
7. Reinstall the trunk.
Challenger and Pursuit
To remove the seat:
1. Remove the upper side panels separately. Gently grasp the front edge of the right side cover and the front lower corner of the left side cover. Pull away from vehicle to release three grommet pins. Use caution to prevent damage to painted surfaces.
2. Locate the seat mount brackets under the edge of the driver's seat. Remove the seat mount bolt (1) from each side of the seat.
3. Pull the seat rearward to disengage the mounting tabs of the seat from the frame mount. Do not allow the seat mount brackets to contact the rear fender.
Model Year 2021+ Challenger
To reinstall the seat:
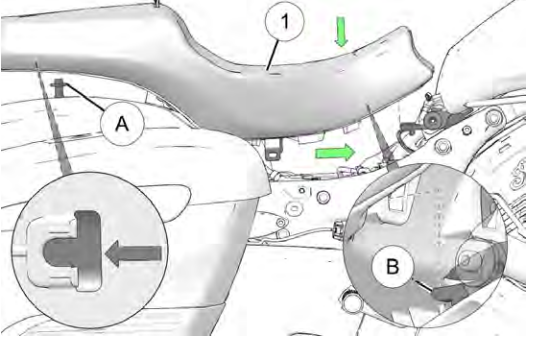
1. Install new seat (1) on motorcycle, insert hat bushing (A) into slot under rear of seat and slide seat forward, ensuring that tabs (B) engage slots on new seat. Do not allow seat mount brackets to contact rear fender.
2. Pull straight up on front of seat to ensure a secure fitting.
3. Move seat (1) until tabs align with hole in frame as shown and reinstall retained screws. Torque screws to 18 ft-lbs (24 Nm).
Model Year 2020 and Older Challenger
To reinstall the seat:
1. Position the seat by inserting the seat mounting tab from rear to front into the mount on top of the frame.
2. Rotate the rear of the seat downward and position the side mount seat brackets onto the frame. Do not allow the seat mount brackets to contact the rear fender.
3. On each side, thread the seat mount bolt through the seat mount bracket and into the frame. Torque seat bolts to 18 ft-lbs (24 Nm).
4. Reinstall the side covers.
Backrest Removal
To remove the backrest on your vehicle, refer to the accessory instructions for your backrest. For more information, read Backrests for Indian Motorcycles.
For more information about your motorcycle, consult your Owner's Manual.
For more seat options, view the full line of accessory Indian Motorcycle seats.
To find replacement parts, view the online parts catalog.
YouTube® is a registered trademark of Google LLC
Unless noted, trademarks are the property of Indian Motorcycle International, LLC
© 2022 Indian Motorcycle International, LLC


