

When removing and installing a battery from your Indian Motorcycle, pay close attention to all safety warnings found in your Owner's Manual. Shop Indian Motorcycle batteries.
Improperly connecting or disconnecting battery cables can result in an explosion and cause serious injury or death. When removing the battery, always disconnect the negative (black) cable first. When reinstalling the battery always connect the negative (black) cable last.
Do not remove the battery cables while the engine is running. Doing so may damage the Electronic Control Unit (ECU). Take great care not to reverse the battery leads when installing the battery. Reverse power applied to the ECU will damage it instantly.
Complete instructions for these and other maintenance procedures can be found in your Owner's Manual.
Chief, Indian Vintage, Chieftain, Indian Springfield and Roadmaster Models
To remove the battery, follow these steps:
1. Remove the seat.
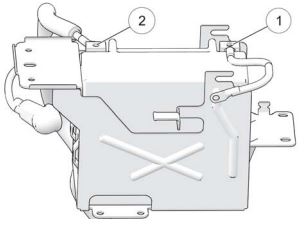
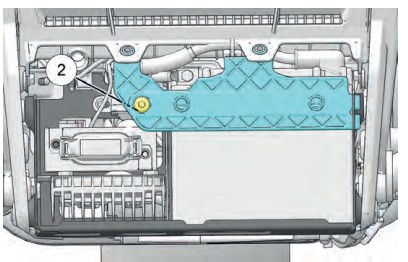
2. Using a 10mm wrench or Phillips screwdriver, remove the negative battery cable (1) from the battery terminal. Position the cable well clear of the terminal.
3. Remove the fastener securing the battery cover to the frame crossmember using a 5mm Allen wrench.
4. Lift the cover, with the attached electronic module in place, folding the wires toward the fuel tank. WARNING: DO NOT allow the Vehicle Control Module (VCM) to touch the battery terminals or it will damage the VCM instantly.
5. Remove the rubber cover from the positive battery cable (2) and remove the cable from the terminal. Position the cable well clear of the terminal. WARNING: If the VCM touches the positive battery post or wire, the VCM can short out.
To reinstall the battery, follow these steps:
1. Inspect the battery box and cover for damage. Be sure pads are in good condition and properly located.
2. Make sure cable ends and battery terminals are clean. Apply a light film of dielectric grease to the terminal bold threads.
3. Carefully position the battery into the battery box with the negative terminal toward the front of the motorcycle. The battery for a Chief, Indian Vintage, Chieftain, Indian Springfield or Roadmaster is part number 4011496.
4. Make sure the positive cable (1) is routed horizontally and perpendicular to the long side of the battery. Connect the positive cable to the positive battery terminal. Torque to 45 in-lbs (5 Nm).
5. Install the negative cable last. Route the starter ground cable beneath the frame ground cable on the negative battery terminal. Torque to 45 in-lbs (5 Nm).
6. Reinstall the battery cover and fastener. Torque to 84 in-lbs (9.5 Nm).
7. Reinstall the seat.
The following video demonstrates the removal and installation process for Chief, Indian Vintage, Chieftain, Indian Springfield and Roadmaster motorcycles.
Scout Models
To remove the battery, follow these steps:
1. Remove the seat.
2. Remove the fuse box from the frame of the motorcycle. Use care to avoid pulling or stretching wires. Fold the wires to the right rear side of the motorcycle.
3. Remove the battery hold-down strap using a 13mm wrench.
4. Using a 10mm wrench or Phillips screwdriver, remove the negative battery cable from the battery terminal. Position the cable well clear of the terminal.
5. Remove the rubber cover form the positive battery cable and remove the cable from the terminal. Position the cable well clear of the terminal.
6. Tilt the battery slightly rearward and then lift it away from the motorcycle.
To install the battery, follow these steps:
1. Inspect the battery box and cover for damage. Be sure pads are in good condition and properly located.
2. Make sure cable ends and battery terminals are clean. Apply a light film of dielectric grease to the terminal bold threads.
3. Carefully position the battery into the battery box with the negative terminal toward the front of the motorcycle. The battery for a Scout is part number 4017819.
4. Make sure the positive cable is routed horizontally and perpendicular to the long side of the battery. Connect the positive cable to the positive battery terminal. Reapply the rubber protective cover over the top of the positive battery terminal. Torque to 45 in-lbs (5 Nm).
5. Install the negative ground cable last. Route the starter ground cable beneath the frame ground cable on the negative battery terminal. Torque to 45 in-lbs (5 Nm).
6. Reinstall the battery hold-down strap using a 13mm wrench. Torque to 96 in-lbs (10.8 Nm).
7. Reinstall the fuse box.
8. Reinstall the seat.
FTR Models
To remove the battery, follow these steps:
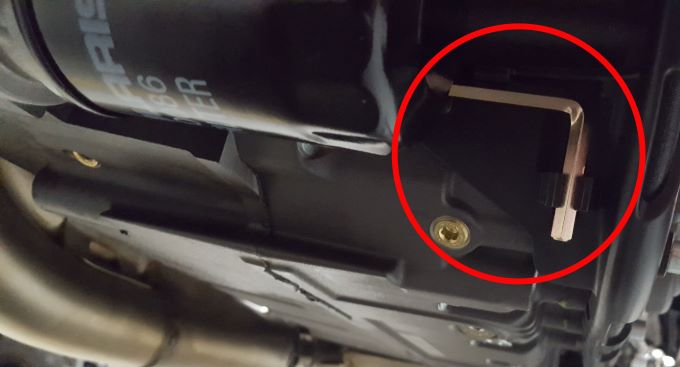
The battery cover and battery can be removed using the on-board multi tool, which is shown below. The multi tool includes a 6mm Allen wrench and a Phillips screwdriver. The battery is located in the front of the motorcycle.
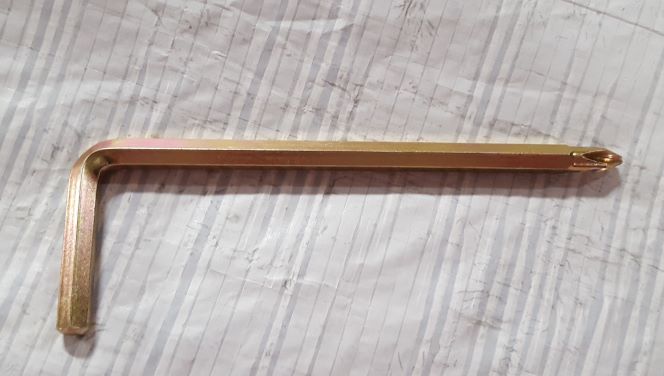
The multi tool can be found on the left front of the crankcase, behind the oil filter.
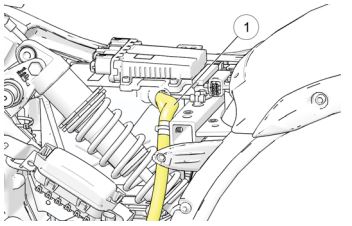
1. Remove the battery cover by removing three fasteners (1), using a 6mm Allen wrench or socket. A 6mm Allen wrench is included in the multi tool.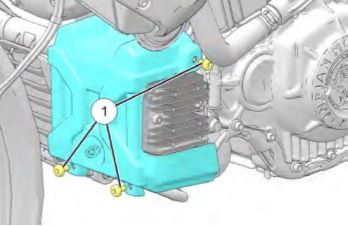
2. Disconnect the negative battery terminal using the Phillips screwdriver on the multi tool or a 10mm wrench. Use caution. Be careful not to cross the battery terminals.
3. Disconnect the positive battery terminal.
4. Remove the battery from the battery box.
To install the battery, follow these steps:
1. Install the battery into the battery box. The battery for the FTR is part number 4017581.
2. Connect the positive battery terminal. Torque the fastener to 25 in-lbs (3 Nm).
3. Connect the negative battery terminal. Torque the fastener to 25 in-lbs (3 Nm).
4. Install the battery cover and the three fasteners. Torque the fasteners to 36 in-lbs (4 Nm).
Challenger and Pursuit Models
To remove the battery, follow these steps:
1. Remove the chin fairing by removing its fasteners (1).
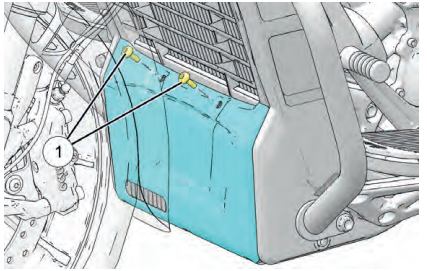
2. Remove the battery bracket by removing its fastener (2) and sliding the bracket out of its retention feature.
3. Disconnect the negative battery terminal. Warning: Be careful not to cross battery terminals.
4. Disconnect the positive battery terminal.
5. Remove the battery from the battery box.
To install the battery, follow these steps:
Note: Be sure cable ends and battery terminals are clean. Apply a light film of dielectric grease to terminal fastener threads.
1. Carefully install the battery into the battery box.
2. Connect the positive battery terminal. Torque the fastener to 48 in-lbs (5.4 Nm).
3. Connect the negative battery terminal. Torque the fastener to 48 in-lbs (5.4 Nm).
4. Install the battery bracket and fastener. Torque the fastener to 84 in-lbs (10 Nm).
5. Apply dielectric grease over terminal areas for corrosion protection.
6. Install the chin faring and fasteners. Torque to 36 in-lbs (4 Nm).
7. Reinstall the seat.
Shop all Indian Motorcycle batteries
For more maintenance procedures, consult your Owner's Manual.
To find replacement parts for your motorcycle, use the online parts catalog.
To find an Indian Motorcycle Dealer near you, use the Dealer Locator.
YouTube® is a registered trademark of Google LLC
Unless noted, trademarks are the property of Indian Motorcycle International, LLC
© 2022 Indian Motorcycle International, LLC


