

Headlight Adjustment for Indian Springfield, Indian Vintage, Model Year 2020 and Older Chief
To change the headlight lamp bulb:
1. Remove the six bolts securing the front nacelle headlight shroud. Pull this piece forward to access the headlight.
2. Remove the sealing boot. Press the looped end of the wire bulb retainer clip and swing the end toward the center of the bulb to release it from the latch tab.
3. With the wire harness connector attached, pull the bulb out. Disconnect the wire harness.
4. Install the new bulb and secure the retainer. Tip: Avoid touching a halogen lamp with bare fingers. Oil from your skin leaves a residue, causing a hot spot that will shorten the life of the lamp. If a lamp is touched, clean it thoroughly with denatured alcohol. The bulb is part number 4014860.
5. Reinstall the sealing boot. Make sure it seals tightly around the bulb base and lens to prevent condensation.
6. Reinstall the front nacelle headlight shroud.
7. Tighten the two top bolts. Torque to 36 in-lbs (4 Nm).
8. Tighten the four rear bolts. Torque to 84 in-lbs (9.5 Nm).
Headlight Adjustment for Chieftain
1. Remove the two bolts securing the front trim bezel to the fairing. Pull this piece forward to access the headlight.
2. Remove the four screws (1) securing the headlamp retaining ring (2). Remove the retaining ring. Tool: Phillips screwdriver or universal tool.
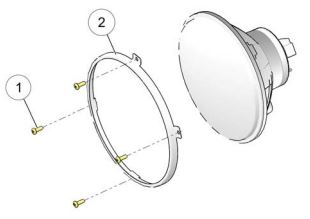
3. Remove the headlight assembly from the headlight carrier.
4. Then remove the sealing boot. Press the looped end of the wire bulb retainer clip and swing the end toward the center of the bulb to release it from the latch tab.
5. With the wire connector attached, pull out the bulb. Disconnect the wire harness.
6. Install the new bulb and secure the retainer. Tip: Avoid touching a halogen lamp with bare fingers. Oil from your skin leaves a residue, causing a hot spot that will shorten the life of the lamp. If a lamp is touched, clean it thoroughly with denatured alcohol. The bulb is part number 4014860.
7. Reinstall the sealing boot. Make sure it seals tightly around the bulb base and lens to prevent condensation.
8. Reinstall the headlight assembly into the carrier, being sure to index the assembly properly.
9. Reinstall the retaining ring with the four screws. Torque to 12 in-lbs (1.4 Nm).
10. Reinstall the front trim bezel and bolts. Torque to 36 in-lbs (4 Nm).
Headlight Replacement for Challenger, Roadmaster and Model Year 2022+ Chief Models
The LED headlight is not serviceable. If the headlight becomes damaged or inoperable, the entire headlight assembly must be replaced. See your Indian Motorcycle Dealer.
Headlight Aim Inspection
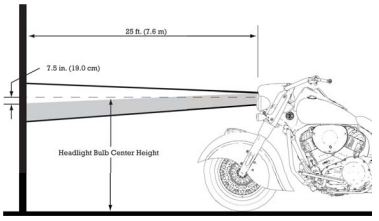
For motorcycles with incandescent headlights, on high beam, the center of highest intensity (appearing as a diamond shape) should be 7.5 inches (19 cm) lower than the headlamp and centered straight ahead at 25 feet (7.6 m).
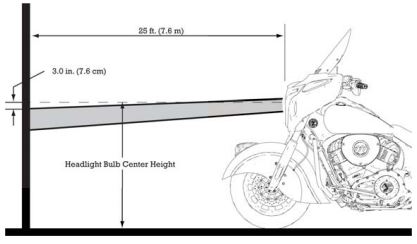
For vehicles equipped with LED headlights, on low beam, the top of the low beam cutoff (appearing as a diamond shape) should be 3 inches (7.6 cm) lower than the headlamp center height at 25 feet (7.6 m).
Follow these steps to ensure an accurate aim inspection:
1. Check and adjust the tire pressure to specification.
2. Verify the suspension ride height (preload) is set to specification.
3. Move the motorcycle to a clear area with a level floor and dim lighting, and place it so the top front edge of the headlight housing is 25 feet (7.6 m) from the wall.
4. With the rider and passenger (if applicable) on board, bring the motorcycle to a fully upright position. Center the handlebars in a straight ahead position.
5. Start the engine and switch the headlight on to the specified mode. For models with incandescent headlights, that is HIGH. For models with LED headlights, that is LOW.
6. Compare the position of the headlight beam on the wall to the above illustrations, and adjust if necessary.
Challenger and Model Year 2022+ Chief Aim Inspection
Adjust headlight aim when there is a change in load (rider, cargo, accessories, etc.) or after suspension adjustment.
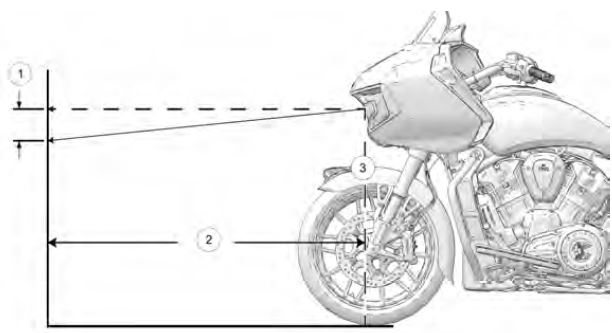
| Number | Description |
| 1 | Stock ECE and CCC compliant measure distance = 7 in (17.8 cm) |
| Optional North American only measure distance = 4 in (10.2 cm) | |
| 2 | Measure distance = 32 ft 10 in (10.0 m) |
| 3 | Headlight Center |
On LOW beam, the top of the horizontal cut-off of the light beam (1) should be 4 inches (10 cm) lower than the center of the headlight bulb and centered straight ahead at 32 feet, 10 inches (10 m). To inspect your headlight aim, do the following:
1. Verify that tire pressure is at specification.
2. Verify that rear suspension ride height (preload) is at specification.
3. Position the motorcycle on a level surface with the headlight 32 feet, 10 inches (10 m) from a wall.
4. With the operator and passenger (if applicable) on board, bring the motorcycle to the fully upright position.
5. Start the engine and switch the headlight to low beam. Observe the headlight aim on the wall.
6. Make any necessary adjustments to headlight aim.
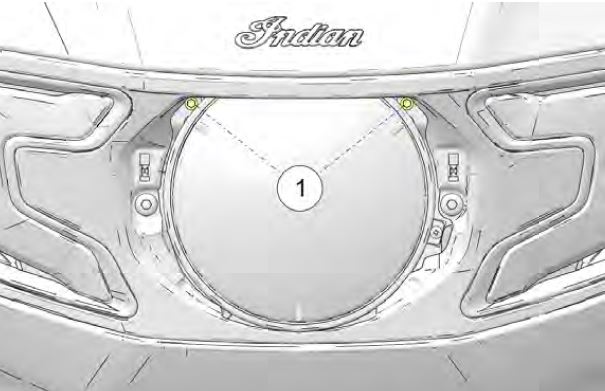
Chieftain Dark Horse Headlight Aim Adjustment
The headlamp adjustment screws (1) are located inside the headlight housing.

On Chieftain Dark Horse models only, remove the two headlight bezel screws and remove the bezel from the fairing to access the adjustment screws. Reinstall the bezel after adjusting the headlamp. Tool: 4mm Allen socket or universal tool.
To adjust the headlamp vertically, tighten both top adjustment screws equally to adjust the beam downward. Loosen both screws equally to adjust the beam upward. Tool: 4mm Allen socket or universal tool.
To adjust the headlamp horizontally, loosen the left side screw to adjust the beam to the left. Loosen the right side screw to adjust the beam to the right.
Challenger and Pursuit Aim Adjustment
The headlight adjustment screws (1) are located inside the headlamp housing.
To adjust the headlight, do the following:
1. Remove the headlight bezel by prying down at the top center to release the retention detent. Then pull forward from the top to release the side retention clips.
2. To adjust the headlamp vertically, tighten both top adjustment screws equally to adjust the beam downward. Loosen both screws equally to adjust the beam upward. Use an M4 hex wrench or universal tool.
3. To adjust the headlamp horizontally, loosen the left-side screw to adjust the beam to the left. Loosen the right-side screw to adjust the beam to the right.
Model Year 2022+ Chief Aim Adjustment
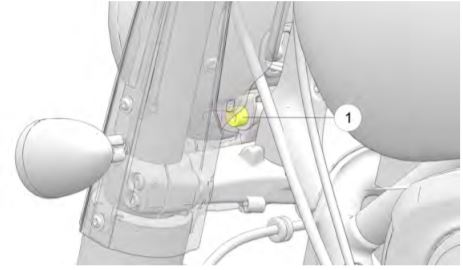
The headlight adjustment screw (1) is located on the left side of the headlamp housing base. To adjust the headlight vertically:
1. Loosen the headlamp pivot fastener. Rotate the headlight assembly upward or downward.
2. When the headlight beam is correct, tighten the fastener. Torque to 29 ft-lbs (40 Nm).
For more information, see your authorized Indian Motorcycle Dealer. Find a dealer near you with the Dealer Locator.
Maintenance tips, procedures and specifications can be found in your Owner's Manual.
To find diagrams and replacement part numbers, use the online parts catalog.
YouTube® is a registered trademark of Google LLC
Unless noted, trademarks are the property of Indian Motorcycle International, LLC
© 2022 Indian Motorcycle International, LLC


