The engine oil and filter change procedure for Indian Motorcycle 111/116 models varies based on engine build date. An Indian Springfield, Indian Vintage, Chief, Chieftain or Roadmaster has either a 5.5 quart or 6.0 quart engine.
Changing the oil and oil filter frequently is one of the easiest ways to extend the life of your Indian Motorcycle. Refer to this Maintenance Schedule or the Periodic Maintenance Chart in your Owner's Manual to determine how often to change the oil and oil filter. Always wear safety glasses and nitrile gloves when changing the oil on your Indian Motorcycle.
Which Engine Do I Have?
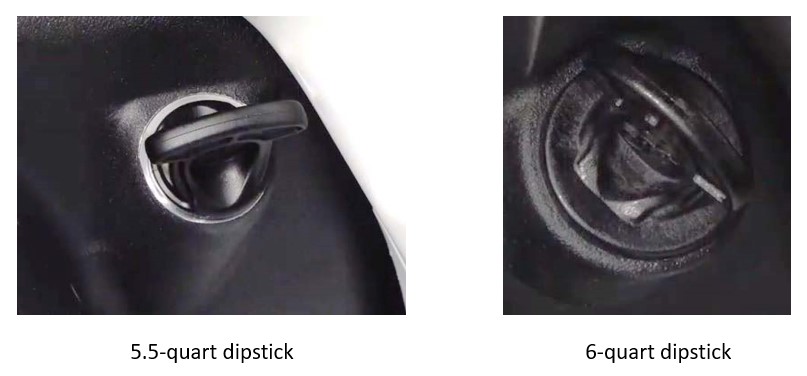
Vehicles built before February 2019 are equipped with 5.5-quart engines. These motorcycles have shorter dipsticks. When installed, they show a silver ring on the crankcase. Vehicles built February 2019 or later are equipped with a 6.0-quart engine. They feature a longer dipstick.
See the photos below for a side-by-side comparison.
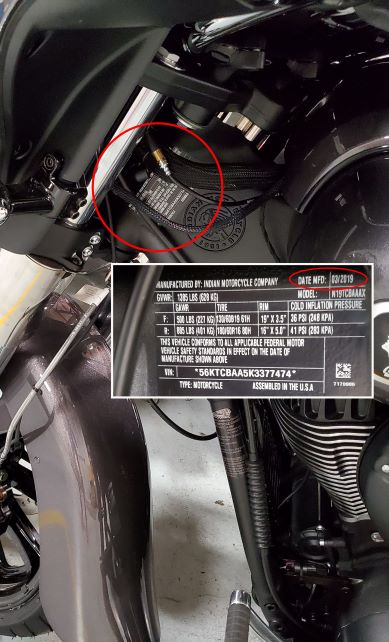
The build date for your motorcycle can be found on the Vehicle Identification (VIN) label. This label can be found on the left side of the steering head, as shown below.
The below videos detail the oil and filter change process for each engine size.
5.5 Quart Oil Change
| Required Tools and Supplies | |
| Shop Rags | Ratchet |
| Oil Pan | Funnel |
| 6mm Allen socket | Torque Wrench |
| Nitrile Gloves | Eye Protection |
| 2.5-Inch (64mm) Oil Filter Wrench | |
To change the oil and filter on your 5.5-quart engine, follow these steps:
1. Park the bike on a flat, level surface.
2. Start the engine and allow it to warm up at idle for 2 to 3 minutes.
3. Stop the engine.
4. Remove any debris near the engine oil dipstick and remove the oil dipstick.
5. Clean the area around the oil drain plugs.
6. Place a drain pan under the engine crankcase. Tip: Place a rag in the bottom of the drain pan to prevent the splashing of oil.
7. Remove both drain plugs and sealing washers and allow the oil to drain completely.
8. While the oil is draining, remove the engine oil filter with a 2.5-inch (64mm) oil filter wrench.
9. Using a clean dry cloth, clean the filter sealing surface on the crankcase. Make sure the old filter O-ring is completely removed.
10. Lubricate the O-ring on the new filter with a film of fresh engine oil. Ensure the O-ring is in good condition.
11. Install the new filter and rotate it clockwise by hand until the filter gasket contacts the sealing surface, and then turn it an additional ¾ of a turn.
12. Inspect the drain plugs and sealing surfaces. Install new sealing washers on the drain plugs. Notice: The sealing surfaces on the drain plug and crankcase should be clean and free of burrs, nicks or scratches.
13. Clean the sealing surfaces and reinstall the drain plugs. Torque to 15 ft-lbs (20 Nm).
14. Wipe up any residual oil on the vehicle.
15. Fill the engine with 4.5 quarts of oil through the oil dipstick hole.
16. Reinstall the oil dipstick.
17. Start the engine and run at varying speeds up to 2,500 RPM for three minutes.
18. Stop the engine and inspect for leaks.
19. Add the additional quart of oil to bring the oil level between the ADD and FULL marks. Do not add oil if the oil level is between ADD and FULL marks. Caution: Overfilling can result in loss of engine performance and an oil-saturated air filter. Use a suction device to remove excess oil if overfilled.
20. Start the engine and allow it to run until operating temperature is reached.
21. Stop the engine and wait 1 to 2 minutes.
22. With the aid of an assistant, stand the bike upright.
23. Remove the dipstick, wipe with a clean shop rag, and reinstall until fully threaded in. Remove the dipstick again and check the oil level. Ensure the oil level is between the ADD and FULL marks. Do not add oil if the level is between the ADD and FULL marks. Notice: The oil level must be checked with the bike upright and not on the sidestand for an accurate reading.
24. Wipe up any residual oil that may have collected on vehicle components.
25. Dispose of the used oil and filter properly.
6.0 Quart Oil Change
| Required Tools and Supplies | |
| Shop Rags | Ratchet |
| Oil Pan | Funnel |
| 6mm Allen socket | Torque Wrench |
| Nitrile Gloves | Eye Protection |
| 2.5-Inch (64mm) Oil Filter Wrench | |
To change the oil and filter on your 6.0-quart engine, follow these steps:
1. Park the bike on a flat, level surface.
2. Change the engine oil and filter when the engine is warm. If the engine is cold, start the engine and allow it to reach operating temperature.
3. Stop the engine.
4. Remove any debris near the engine oil dipstick and remove the oil dipstick.
5. Clean the area around the oil drain plugs.
6. Place a drain pan under the engine crankcase. Tip: Place a rag in the bottom of the drain pan to prevent the splashing of oil.
7. Remove the drain plugs and allow the oil to drain completely.
8. While the oil is draining, remove the engine oil filter with a 2.5 inch (64 mm) oil filter wrench.
9. Using a clean dry cloth, clean the filter sealing surface on the crankcase. Make sure the old filter O-ring is completely removed.
10. Lubricate the O-ring on the new filter with a film of fresh engine oil. Ensure the O-ring is in good condition.
11. Install the new filter and rotate it clockwise by hand until the filter gasket contacts the sealing surface, and then turn it an additional ¾ of a turn.
12. Inspect the drain plugs and sealing surfaces. Install new sealing washers on the drain plugs. Notice: The sealing surfaces on the drain plug and crankcase should be clean and free of burrs, nicks or scratches.
13. Clean the sealing surfaces on the engine and reinstall the drain plug. Torque to 15 ft-lbs (20 Nm).
14. Wipe up any residual oil on the vehicle.
15. Fill the engine with 4.5 quarts of oil through the oil dipstick hole.
16. Reinstall the oil dipstick.
17. Start the engine and allow it to idle for 30 seconds.
18. Stop the engine and inspect for leaks.
19. Add the additional 1.5 quarts of oil to bring the oil level between the ADD and FULL marks. Do not add oil if oil level is between add and fill marks. Caution: Overfilling can result in loss of engine performance and an oil-saturated air filter. Use a suction device to remove excess oil if overfilled.
20. With the aid of an assistant, stand the bike upright.
21. Start the engine and allow to idle for 30 seconds.
22. Remove the dipstick, wipe clean and reinstall until fully threaded in. Remove the dipstick again and check the oil level. Ensure the oil level is between the ADD and FULL marks. Do not add oil if the level is between the ADD and FULL marks. Notice: The oil level must be checked with the bike upright and not on the side stand for an accurate reading.
23. Wipe up any residual oil that may have collected on vehicle components.
24. Dispose of the used oil and filter properly.
Helpful Part Numbers
The oil change kit, which includes 6 quarts of oil, an oil filter and two sealing washers, is part number 2889311.
The required fluid is Indian Motorcycle Semi-Synthetic 20W40 Motor Oil, part number 2880012.
The filter is part number 2521421.
The sealing washer is part number 5812232.
Resetting the Oil Change Interval via RIDE COMMAND
After changing the oil and filter on a RIDE COMMAND-equipped bike, reset the oil change life on the 7" Touchscreen Display powered by RIDE COMMAND.
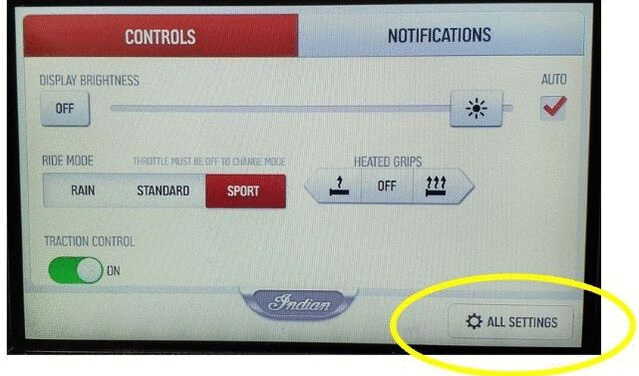
To reset the oil change life on your 2020+ display, follow these steps:
1. Access the drop-down menu by touching the Indian Motorcycle logo at the top of the display. Then select ALL SETTINGS.
2. Navigate to the VEHICLE tab.
3. Select OIL LIFE / SERVICE.
4. The Oil Life/Service screen will tell you how many miles are remaining before an oil and filter change is recommended. To reset the oil life, select RESET.
5. Confirm the oil life reset by selecting RESET.
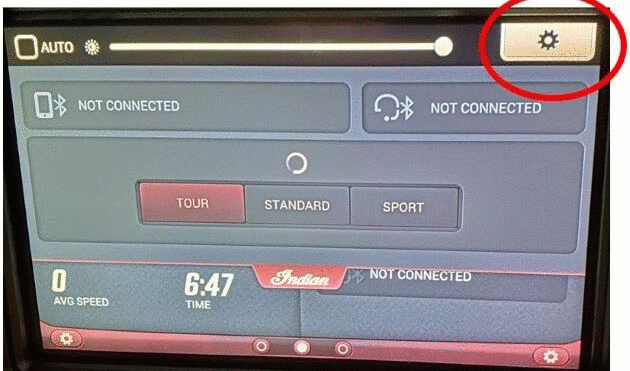
To reset the oil change life on a model year 2019 or older display, follow these steps:
1. Access the drop-down menu by touching the Indian Motorcycle logo at the top of the display. Then touch the settings button in the upper-right-hand corner of the display.
2. Select the VEHICLE menu.
3. From the Vehicle Settings menu, touch the reset button.
4. Confirm that you wish to reset the oil life.
Resetting the Oil Life with the Hand Triggers
After changing the engine oil and filter, reset the oil life using the steps below.
1. Press LEFT TOGGLE to cycle until you reach the Engine Hours/Oil Life display.
2. Press and hold LEFT TOGGLE until the value begins to flash.
3. Press and hold LEFT TOGGLE to reset the engine oil life to 100 percent.
For more information, see your authorized Indian Motorcycle Dealer.
Find a dealer near you with the Dealer Locator.
Maintenance tips, procedures and specifications can be found in your Owner's Manual.
To find diagrams and replacement part numbers, use the online parts catalog.
YouTube® is a registered trademark of Google LLC
Unless noted, trademarks are the property of Indian Motorcycle International, LLC.
© 2022 Indian Motorcycle International, LLC


