

Always wear safety glasses and nitrile gloves when servicing your Indian Motorcycle. To change the headlight lamp bulb on a Chieftain:
1. Remove the two bolts securing the front trim bezel to the fairing. Pull this piece forward to access the headlight.
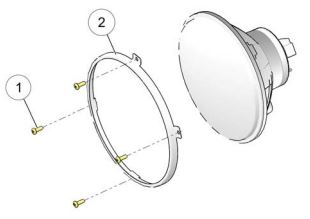
2. Remove the four screws (1) securing the headlamp retaining ring (2). Remove the retaining ring. Tool: Phillips screwdriver or universal tool.
3. Remove the headlight assembly from the headlight carrier.
4. Then remove the sealing boot. Press the looped end of the wire bulb retainer clip and swing the end toward the center of the bulb to release it from the latch tab.
5. With the wire connector attached, pull out the bulb. Disconnect the wire harness.
6. Install the new bulb and secure the retainer. Tip: Avoid touching a halogen lamp with bare fingers. Oil from your skin leaves a residue, causing a hot spot that will shorten the life of the lamp. If a lamp is touched, clean it thoroughly with denatured alcohol. The bulb is part number 4014860.
7. Reinstall the sealing boot. Make sure it seals tightly around the bulb base and lens to prevent condensation.
8. Reinstall the headlight assembly into the carrier, being sure to index the assembly properly.
9. Reinstall the retaining ring with the four screws. Torque to 12 in-lbs (1.4 Nm).
10. Reinstall the front trim bezel and bolts. Torque to 36 in-lbs (4 Nm).
For more information, see your authorized Indian Motorcycle Dealer. Find a dealer near you with the Dealer Locator.
Maintenance tips, procedures and specifications can be found in your Owner's Manual.
To find diagrams and replacement part numbers, use the online parts catalog.
YouTube® is a registered trademark of Google LLC
Unless noted, trademarks are the property of Indian Motorcycle International, LLC
© 2022 Indian Motorcycle International, LLC


