Headlight Lamp Replacement
To remove and replace the headlight lamp bulb on your Indian Scout or Scout Sixty, do the following:
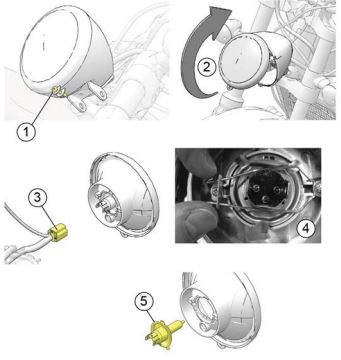
1. Remove the headlight retaining screw (1) with a Phillips socket.
2. Lift the headlight upward and remove it from the base (2).
3. Disconnect the wire harness (3).
4. Remove the rubber boot from the rear of the headlight.
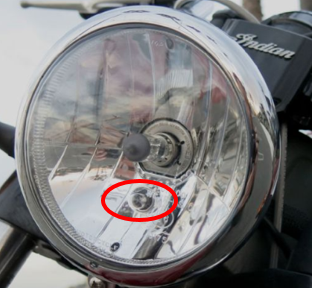
5. Squeeze the bulb retainer (4) and move it away from the bulb. Remove the bulb.
6. Install the new bulb (5) and secure the retainer. The bulb is part number 4014860.
7. Reinstall the rubber boot, making sure it seals around the bulb and headlight.
8. Connect the wire harness.
9. Reinstall the headlight to the base and tighten the screw. Torque to 36 in-lbs (4.1 Nm).
For Scout Bobber Models
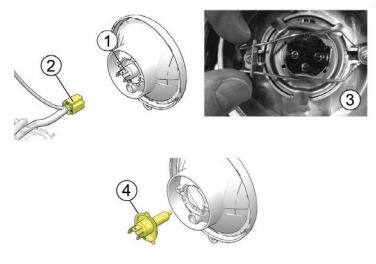
The headlight bulb (1) in a Scout Bobber, Scout Bobber Twenty or Scout Bobber Sixty can be serviced and removed from the back of the headlight bucket without disassembling the headlight lamp.
To replace a bulb, do the following:
1. Disconnect the wire harness (2).
2. Remove the rubber boot from the rear of the headlight.
3. Squeeze the bulb retainer (3) and move it away from the bulb. Remove the bulb.
4. Install the new bulb (4) and secure the retainer.
5. Reinstall the rubber boot, making sure it seals around the bulb and headlight.
6. Connect the wire harness.
Headlight Aim Adjustment
Adjust the headlight aim when there is a change in load (rider, cargo, accessories, etc.) and/or after a suspension adjustment. To inspect the aim on a Scout or Scout Sixty, follow these steps:
1. Verify that tire pressure is at specification. The front tire should be at 36 psi (248 kPa). The rear tire should be 40 psi (276 kPa).
2. Verify that the rear suspension ride height (preload) is at specification. The ride height should be 282mm on both shocks.
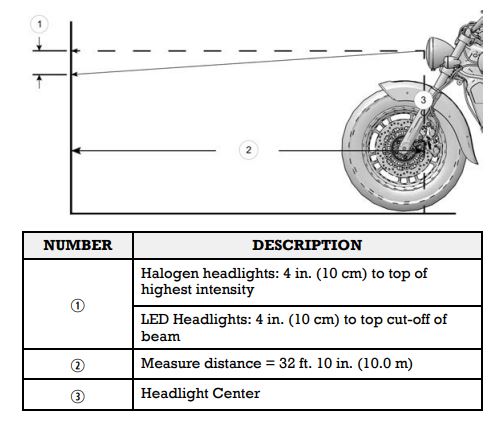
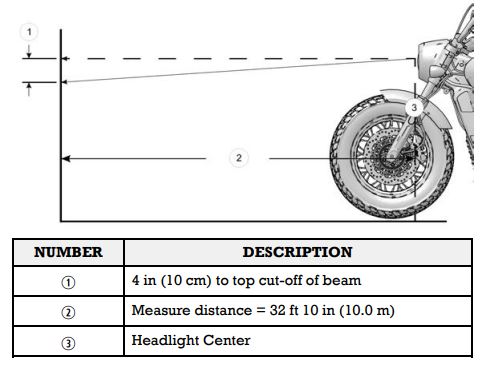
3. Position the motorcycle on a level surface with the headlight 32 feet, 10 inches (10m) from a wall.
4. With the operator and passenger (if applicable) on board, bring the motorcycle to the fully upright position.
5. Start the engine and switch the headlight to low beam. Obseve the headlight aim on the wall.
6. Make any necessary adjustments to the headlight aim, per the diagram below.
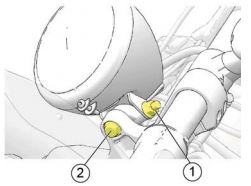
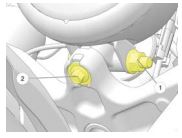
To adjust the headlamp vertically, loosen the housing mount fastener (1) with a 15mm socket and pivot the housing upward or downward. Tighten the fastener. Torque to 35 ft-lbs (47.5 Nm).
To adjust the headlamp horizontally, loosen the headlight mounting bolt (2) with a 10mm socket and pivot the headlight to the left or right. Tighten the bolt. Torque to 18 ft-lbs (24.4 Nm).
For Scout Bobber Models
On LOW beam, the horizontal cut-off of the light beam (1) should be 4 inches (10 cm) lower than the center of the headlight bulb and centered straight ahead at 32 feet, 10 inches (10m).
To inspect the aim on a Scout Bobber, do the following:
1. Verify that the tire pressure is at specification. The front tire should be at 36 psi (248 kPa). The rear tire should be 40 psi (276 kPa).
2. Verify that the rear suspension ride height (preload) is at specification. The ride height should be 275mm on both shocks.
3. Position the motorcycle on a level surface with the headlight 32 feet, 10 inches (10m) from a wall.
4. With the operator and passenger (if applicable) on board, bring the motorcycle to the fully upright position.
5. Start the engine and switch the headlamp to low beam. Observe the headlight aim on the wall.
6. Make any necessary adjustments to the headlight aim.
To adjust the headlamp vertically, loosen the housing mount fastener (1) with a 15mm socket and pivot the housing upward or downward. Tighten the fastener. Torque to 35 ft-lbs (47.5 Nm).
To adjust the headlamp horizontally, loosen the headlight mounting bolt (2) with a 10mm socket and pivot the headlight to the left or right. Tighten the bolt. Torque to 18 ft-lbs (24.4 Nm).
Inside the headlight assembly you also will find a smaller position bulb shown below. This can be replaced using the same procedure as the main headlight procedure detailed above. The position bulb is required for compliance purposes in certain markets and helps provide visibility of the motorcycle in the event your headlight bulb is inoperable. Never operate your motorcycle without an operational headlight. When the motorcycle's ignition is in accessory mode, the position bulb will be illuminated while the headlight bulb remains off. To place your bike in accessory position, turn the key forward to the on position and then push the key inward and turn forward to the accessory position. The position bulb is part number 4015261.
For more on maintenance procedures, consult your Owner's Manual.
To find replacement parts, view the online parts catalog.
To find an Indian Motorcycle Dealer near you, use the Dealer Locator.
Unless noted, trademarks are the property of Indian Motorcycle International, LLC
© 2022 Indian Motorcycle International, LLC


